
PC Screen recorder : One of the Best free screen recorders for Windows laptop/ PC and Mac

HIGHLIGHTS
- Xbox Game Bar is the most reliable screen recorder for Windows 10 laptop/ PC
- macOS PC and Laptops users can rely on built-in QuickTime Player to record screens
- To Windows 7 laptops, there are many screen recording apps out there
Screen recorders for Computers or PCs come in nearby when you need to save live streaming, film a tutorial, or distribute what you’re watching with your friends. You don’t want a third-party app to record the screen on Windows 10 PC/laptops and Mac. Both devices come with a built-in screen recorder that allows you to capture everything that is where on the screen and save it as an mp4 file for free. That stated, Windows 7 laptops and PCs don’t own a screen recording convenience. You want to download a third-party recorder. Here we’ve outlined a few easy steps on how to record screen on Windows 10 PC/laptop and Mac, with the best screen recorder for Windows 7 laptop/pc that you can use. Take a glimpse:
Xbox Game Bar: Screen recorder for Windows 10 laptop and PC
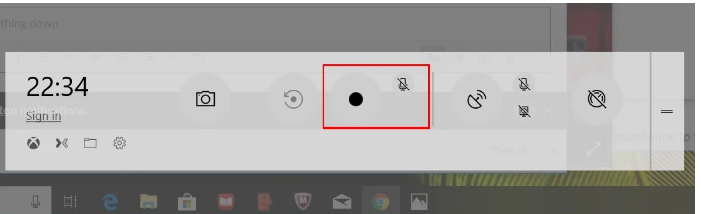
- To record videos on the screen in Windows 10 laptops for free, press Windows key + G to run Xbox Game Bar
- Pick the “Yes, this is a game” checkbox to ready the Game Bar
- Initiate the app whose screen you want to record
- Click on the start source recording button or press Win + Alt + R to record the running screen.
- Allow the microphone of the game bar, if you desire to record audio as well
- Stop the recording by selecting or clicking on the red button
- That’s it! The desktop screen recording in Windows 10 will be saved as MP4 on your computer under the Videos folder in a subfolder named Captures. You can also view the recording from the Xbox app below the Game DVR menu
It’s worth considering that this screen recorder for Windows 10 PCs/laptops only runs on a handful of apps. Xbox Game Bar can’t capture the whole desktop and programs like a File manager. You can utilize a third-party Windows 7 screen recorder to record the screen on Windows 10 laptop/ PC.
OBS Studio: Screen recorder app for Windows 10 laptop
Windows 7 users download the screen recorder app OBS Studio on their PC. The app is with the nicest screen recorder apps for PC out where. You can sideload it on Windows 10, macOS, and Linux laptops as great to record full screen for free.
- Just search the link https://obsproject.com/ in your PC web browser and download the OBS Studio settings file for Windows on your computer desktop
- Downloaded data are usually saved in Downloads –> go to the folder and double-click on the OBS Studio settings file
- This will help the installation window to start
- Install OBS Studio and start it on your device
- The initial time you operate OBS Studio, it’ll ask if you need to run the Auto-Configuration Wizard. Click ‘Yes’ and grasp the prompts.
- You’re now suitable to record screens in Windows 7. Agree on the ‘+’ icon –> ‘Display Capture’ –> ‘Create new’ –> Enter a name for your capture –> Click ‘Ok’
- Start and Stop recording opportunities will be in the lower-right part of the OBS Studio window
- The full-screen recording will be stored on your desktop. To observe it, click ‘File’ in the menu bar & ‘Show Recordings’ in the resulting drop-down menu
QuickTime Player: Screen recorder for Mac
Screen recording on macOS PCs/laptops can be made utilizing the built-in QuickTime Player. In extension to capturing what’s on your screen, the purpose lets you record outside audio through a microphone. That stated it doesn’t let you record inside audio. Download the aforementioned OBS Studio app for that.
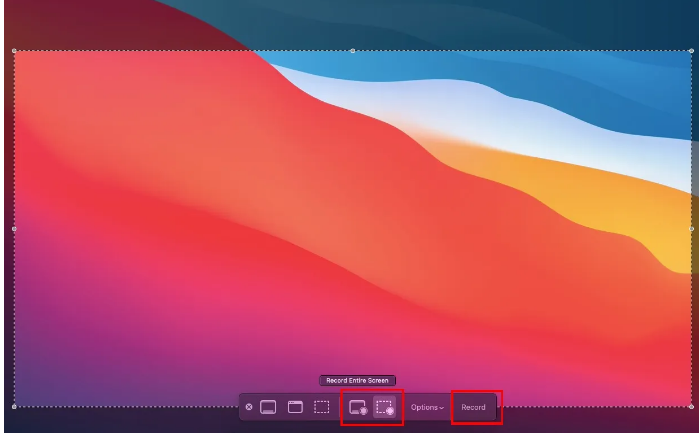
- To record screen in macOS working QuickTime Player, press Command + Shift + 5
- Alternatively, you can also begin the QuickTime Player, then go to ‘Files’ and choose ‘New Screen Recording’
- A command bar will seem at the bottom of your screen with choices to record the screen as well as choose a screenshot
- You own the option to record the whole screen or a specific portion. Additionally, go to ‘Options’ to set your favorites, enable the microphone, set timer, and more extra
- When you’re set, click “Record”. If it’s the whole screen, click wherever to start recording
- Click the stop button on the right edge of the menu bar at the head of the screen or press Command + Control + Esc to stop recording. You can further press Command + Shift + 5 to see the screenshot
- The screen record will be saved on our desktop or your chosen location
Extremely like Windows 10, the screen recorder for macOS desktops doesn’t include all programs. Some apps, like Apple’s built-in DVD Player, will prevent or block you from making any screen recording.
How to record streaming videos on desktop
You can apply the above-mentioned steps to record the screen in Windows/ macOS to record streaming videos on the desktop as properly. Having said that, the steps won’t operate on all streaming platforms. Additionally, you’ll not be capable to record inside audio unless you switch on the external mic and turn up the volume, which won’t provide you high audio quality, or download a third-party app like Soundflower or Audacity.


![The Best Ways to Fix [pii_email_a32d8b04996f6ae8eeb0] Error in MS Outlook](https://webtechminds.com/wp-content/uploads/2021/10/Outlook-Error-Code-Solved-696x450.jpg)